spring MVC

spring MVC

为什么在WEB下接入spring?

极高的提高开发效率

如何在web环境中整合spring容器?

常见的web容器是tomcat,在tomcat中主要的组件是servlet、监听器等,tomcat的配置在WEB-INF/web.xml中

常见配置:

1
2
3
4
5
6
7
8
9
10
11
12
13
14
15
16
17
18
19
20
21
22
23
24
25
26
27
28
29
30
31
32
33
34
35
36
37
<?xml version="1.0" encoding="UTF-8"?>
<web-app xmlns="http://xmlns.jcp.org/xml/ns/javaee"
xmlns:xsi="http://www.w3.org/2001/XMLSchema-instance"
xsi:schemaLocation="http://xmlns.jcp.org/xml/ns/javaee http://xmlns.jcp.org/xml/ns/javaee/web-app_4_0.xsd"
version="4.0">

<!--配置根容器上下文配置文件,默认位置是/WEB-INF/applicationContext.xml-->
<context-param>
<param-name>contextConfigLocation</param-name>
<param-value>/WEB-INF/applicationContext.xml</param-value>
</context-param>

<!--监听器-->
<listener>
<listener-class>org.springframework.web.context.ContextLoaderListener</listener-class>
</listener>

<!-- 配置DispatchcerServlet -->
<servlet>
<servlet-name>Main</servlet-name>
<servlet-class>org.springframework.web.servlet.DispatcherServlet</servlet-class>
<!--配置servlet容器上下文配置文件,默认位置是WEB-INF/[DispatcherServlet的Servlet名字,也就是Main]-servlet.xml-->
<init-param>
<param-name>contextConfigLocation</param-name>
<param-value>classpath:Main-servlet.xml</param-value>
</init-param>
<!-- load-on-startup:表示启动容器时初始化该Servlet; -->
<load-on-startup>1</load-on-startup>
</servlet>

<servlet-mapping>
<servlet-name>Main</servlet-name>
<!-- url-pattern:表示哪些请求交给Spring Web MVC处理, “/” 是用来定义默认servlet映射的。 -->
<!-- 也可以如“*.html”表示拦截所有以html为扩展名的请求。 -->
<url-pattern>/</url-pattern>
</servlet-mapping>
</web-app>

根容器的初始化

先来看看 ContextLoaderListener 有什么作用:

image-20200609155939201

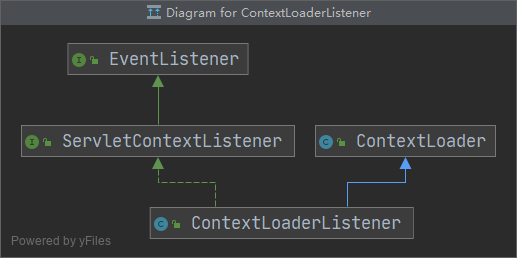
ContextLoaderListener 实现了 ServletContextListener 接口,ServletContextListener 是 tomcat 中的监听器:

1
2
3
4
5
6
7
8
9
10
11
12
public interface ServletContextListener extends EventListener {

/**
* web应用启动时调用
*/
public void contextInitialized(ServletContextEvent sce);

/**
* web应有销毁时调用
*/
public void contextDestroyed(ServletContextEvent sce);
}

接着看 ContextLoaderListener 如何实现 contextInitialized:

1
2
3
4
5
6
class ContextLoaderListener {
@Override
public void contextInitialized(ServletContextEvent event) {
initWebApplicationContext(event.getServletContext());
}
}

调用了父类方法 ContextLoader:

1
2
3
4
5
6
7
8
9
10
11
12
13
14
15
16
17
18
19
20
21
22
23
24
25
26
27
28
29
30
class ContextLoader {
public WebApplicationContext initWebApplicationContext(ServletContext servletContext) {

//校验和日志...

try {
// 1. 实例化容器
if (this.context == null) {
this.context = createWebApplicationContext(servletContext);
}
// 2. 配置并启动
if (this.context instanceof ConfigurableWebApplicationContext) {
ConfigurableWebApplicationContext cwac = (ConfigurableWebApplicationContext) this.context;
//设置父容器
if (!cwac.isActive()) {
if (cwac.getParent() == null) {
ApplicationContext parent = loadParentContext(servletContext);
cwac.setParent(parent);
}
configureAndRefreshWebApplicationContext(cwac, servletContext);
}
}
// 3. 保存容器
servletContext.setAttribute(WebApplicationContext.ROOT_WEB_APPLICATION_CONTEXT_ATTRIBUTE, this.context);

//其他无关代码..
return this.context;
}
}
}

接着看如何进行容器的实例化,进入 ContextLoader##createWebApplicationContext() :

1
2
3
4
5
6
7
8
9
10
class ContextLoader {
protected WebApplicationContext createWebApplicationContext(ServletContext sc) {
Class<?> contextClass = determineContextClass(sc);
if (!ConfigurableWebApplicationContext.class.isAssignableFrom(contextClass)) {
throw new ApplicationContextException("Custom context class [" + contextClass.getName() +
"] is not of type [" + ConfigurableWebApplicationContext.class.getName() + "]");
}
return (ConfigurableWebApplicationContext) BeanUtils.instantiateClass(contextClass);
}
}

进入 ContextLoader##determineContextClass(),该方法决定容器的具体类型 :

1
2
3
4
5
6
7
8
9
10
11
12
13
class ContextLoader {
protected Class<?> determineContextClass(ServletContext servletContext) {
// 1. 查询xml中contextClass参数配置
String contextClassName = servletContext.getInitParameter(CONTEXT_CLASS_PARAM);
if (contextClassName != null) {
return ClassUtils.forName(contextClassName, ClassUtils.getDefaultClassLoader());
} else {
// 2. 无配置采用默认类型 XmlWebApplicationContext.class
contextClassName = defaultStrategies.getProperty(WebApplicationContext.class.getName());
return ClassUtils.forName(contextClassName, ContextLoader.class.getClassLoader());
}
}
}

接着看如何配置容器并启动,进入 ContextLoader##configureAndRefreshWebApplicationContext():

1
2
3
4
5
6
7
8
9
10
11
12
13
14
15
16
17
18
19
20
21
22
23
24
25
26
27
28
class ContextLoader {
protected void configureAndRefreshWebApplicationContext(ConfigurableWebApplicationContext wac, ServletContext sc) {
if (ObjectUtils.identityToString(wac).equals(wac.getId())) {
// 配置容器id
String idParam = sc.getInitParameter(CONTEXT_ID_PARAM);
if (idParam != null) {
wac.setId(idParam);
} else {
// Generate default id...
wac.setId(ConfigurableWebApplicationContext.APPLICATION_CONTEXT_ID_PREFIX +
ObjectUtils.getDisplayString(sc.getContextPath()));
}
}

// 保存 ServletContext
wac.setServletContext(sc);
// 配置 bean定义 xml路径,默认是/WEB-INF/applicationContext.xml
String configLocationParam = sc.getInitParameter(CONFIG_LOCATION_PARAM);
if (configLocationParam != null) {
wac.setConfigLocation(configLocationParam);
}

//else...

// 启动容器
wac.refresh();
}
}

直此,根容器就启动起来,根容器 和 ServetContext 相互持有对方的实例,因此根容器所处的上下文就是 ServetContext 上下文,之后便可在web环境下使用spring容器的 IOC 和 AOP 功能。

spring MVC

MVC 就不必多言了,至于为什么选择 spring MVC,而不是struts2等,还不是因为它比较好用。

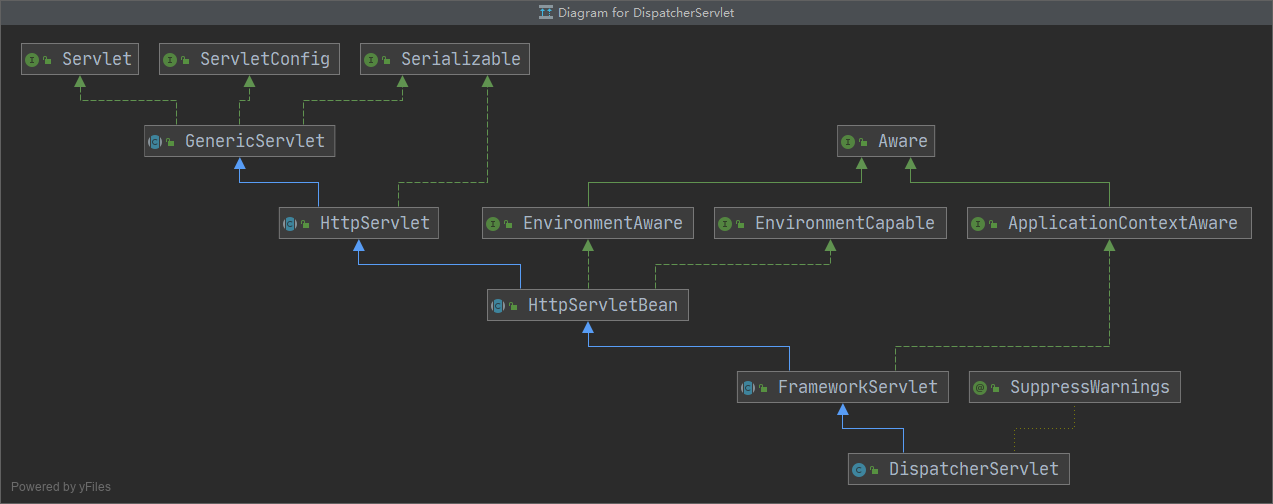
如何接入spring MVC 呢,还记得我们之前配置文件中配置的一个servlet吗?——DispatcherServlet

DispatcherServlet 作为 tomcat 的组件,有其web容器中的生命周期:

image-20200609172103097

1
2
3
4
5
6
7
8
9
10
11
12
public interface Servlet {

public void init(ServletConfig config) throws ServletException;

public ServletConfig getServletConfig();

public void service(ServletRequest req, ServletResponse res) throws ServletException, IOException;

public String getServletInfo();

public void destroy();
}

所有 servlet 的init方法在 tomcat 启动时都会被调用,我们看 DispatcherServlet 的 init(),其实现在父类 HttpServletBean 中:

1
2
3
4
5
6
7
8
9
10
11
12
13
14
15
16
17
18
19
20
21
22
23
24
25
26
27
28
29
30
31
32
class HttpServletBean {
public final void init() throws ServletException {
if (logger.isDebugEnabled()) {
logger.debug("Initializing servlet '" + getServletName() + "'");
}

// 从xml的init参数设置属性值
PropertyValues pvs = new ServletConfigPropertyValues(getServletConfig(), this.requiredProperties);
if (!pvs.isEmpty()) {
try {
BeanWrapper bw = PropertyAccessorFactory.forBeanPropertyAccess(this);
ResourceLoader resourceLoader = new ServletContextResourceLoader(getServletContext());
bw.registerCustomEditor(Resource.class, new ResourceEditor(resourceLoader, getEnvironment()));
initBeanWrapper(bw);
bw.setPropertyValues(pvs, true);
}
catch (BeansException ex) {
if (logger.isErrorEnabled()) {
logger.error("Failed to set bean properties on servlet '" + getServletName() + "'", ex);
}
throw ex;
}
}

// 让子类做他们想做的事情
initServletBean();

if (logger.isDebugEnabled()) {
logger.debug("Servlet '" + getServletName() + "' configured successfully");
}
}
}
1
2
3
4
5
6
>   PropertyValue 和 BeanWrapper 使用小案例:
> A a = new A();
> BeanWrapper beanWrapper = new BeanWrapperImpl(a);
> PropertyValue propertyValue = new PropertyValue("name","qqq");
> beanWrapper.setPropertyValue(propertyValue);
>

子类 FrameworkServlet 重写了 initServletBean 方法:

1
2
3
4
5
6
7
8
9
class FrameworkServlet {
protected final void initServletBean() throws ServletException {
getServletContext().log("Initializing Spring FrameworkServlet '" + getServletName() + "'");
long startTime = System.currentTimeMillis();

this.webApplicationContext = initWebApplicationContext();
initFrameworkServlet();
}
}

进入 FrameworkServlet##initWebApplicationContext :

1
2
3
4
5
6
7
8
9
10
11
12
class FrameworkServlet {
protected WebApplicationContext initWebApplicationContext() {
// rootContext 就是之前创建的 根容器
WebApplicationContext rootContext =
WebApplicationContextUtils.getWebApplicationContext(getServletContext());
// 初始化容器,contextClass参数可以执行容器类,否则默认XmlWebApplicationContext
wac = createWebApplicationContext(rootContext);
// 让子类执行初始化工作
onRefresh(wac);
return wac;
}
}

为什么创建了两个容器?

根容器是web环境下使用的,管理tomcat中所有的bean,而子容器是servlet下使用的,仅管理springMVC中所有的Bean .

追溯 onRefresh(wac) ,可以走到 DispatcherServlet##initStrategies中

1
2
3
4
5
6
7
8
9
10
11
12
13
class DispatcherServlet{
protected void initStrategies(ApplicationContext context) {
initMultipartResolver(context);
initLocaleResolver(context);
initThemeResolver(context);
initHandlerMappings(context);
initHandlerAdapters(context);
initHandlerExceptionResolvers(context);
initRequestToViewNameTranslator(context);
initViewResolvers(context);
initFlashMapManager(context);
}
}

可以看到,initStrategies中做了大量的初始化工作,以 initHandlerMappings 为例说明:

1
2
3
4
5
6
7
8
9
10
11
12
13
14
15
16
17
18
19
20
21
22
23
24
25
26
27
28
29
30
31
32
33
34
35
class DispatcherServlet{
private void initHandlerMappings(ApplicationContext context) {
this.handlerMappings = null;

if (this.detectAllHandlerMappings) {
// 1. 初始化为容器中所有HandlerMapping类的bean
Map<String, HandlerMapping> matchingBeans =
BeanFactoryUtils.beansOfTypeIncludingAncestors(context, HandlerMapping.class, true, false);
if (!matchingBeans.isEmpty()) {
this.handlerMappings = new ArrayList<>(matchingBeans.values());
// We keep HandlerMappings in sorted order.
AnnotationAwareOrderComparator.sort(this.handlerMappings);
}
}
else {
// 2. 初始化为name是handlerMapping的bean
try {
HandlerMapping hm = context.getBean(HANDLER_MAPPING_BEAN_NAME, HandlerMapping.class);
this.handlerMappings = Collections.singletonList(hm);
}
catch (NoSuchBeanDefinitionException ex) {
// Ignore, we'll add a default HandlerMapping later.
}
}

// 3. 容器中没有定义,则采用默认 BeanNameUrlHandlerMapping/RequestMappingHandlerMapping
if (this.handlerMappings == null) {
this.handlerMappings = getDefaultStrategies(context, HandlerMapping.class);
if (logger.isDebugEnabled()) {
logger.debug("No HandlerMappings found in servlet '" + getServletName() + "': using default");
}
}
}

}

至此,DispatcherServlet 中持有了另一个 spring容器。

那么来到第二个问题,servlet 如何工作?

当有请求到来时,根据web中定义的url映射会指派到指定的servlet中执行相应的service()方法, DispatcherServlet 的 service() 实现在 父类 FrameworkServlet 中

1
2
3
4
5
6
7
8
9
10
11
12
13
14
class FrameworkServlet {
protected void service(HttpServletRequest request, HttpServletResponse response)
throws ServletException, IOException {

HttpMethod httpMethod = HttpMethod.resolve(request.getMethod());
if (HttpMethod.PATCH == httpMethod || httpMethod == null) {
// 关键方法
processRequest(request, response);
} else {
// 最终也会走到processRequest
super.service(request, response);
}
}
}

进入 FrameworkServlet##processRequest

1
2
3
4
5
6
7
8
9
10
11
class FrameworkServlet {
protected final void processRequest(HttpServletRequest request, HttpServletResponse response)
throws ServletException, IOException {

// 1. 初始化 LocaleContextHolder RequestContextHolder
// initContextHolders(request, localeContext, requestAttributes);

// 2. 关键方法
doService(request, response);
}
}

进入 DispatcherServle##doService:

1
2
3
4
5
6
class DispatcherServle{

// 1. request.setAttribute...

doDispatch(request, response);
}

进入 DispatcherServle##doDispatch:

1
2
3
4
5
6
7
8
9
10
11
12
13
14
class DispatcherServle {
protected void doDispatch(HttpServletRequest request, HttpServletResponse response) {
//忽略无关代码...

processedRequest = checkMultipart(request);
HandlerExecutionChain mappedHandler = getHandler(processedRequest);
HandlerAdapter ha = getHandlerAdapter(mappedHandler.getHandler());
mappedHandler.applyPreHandle(processedRequest, response);
ModelAndView mv = ha.handle(processedRequest, response, mappedHandler.getHandler());
applyDefaultViewName(processedRequest, mv);
mappedHandler.applyPostHandle(processedRequest, response, mv);
processDispatchResult(processedRequest, response, mappedHandler, mv, dispatchException);
}
}

要理解上面代码到底在做什么,我们得学习下面知识点:

  • HandlerMapping:匹配url和处理器
  • HandlerExecutionChain:包装处理器和拦截器
  • HandlerAdapter:适配处理器:
  • ModelAndView:模型和视图
  • View:视图

HandlerMapping

1
2
3
public interface HandlerMapping {
HandlerExecutionChain getHandler(HttpServletRequest request) throws Exception;
}

AbstractHandlerMapping 做了基本的实现

1
2
3
4
5
6
7
8
9
10
11
12
13
14
15
16
17
18
19
20
21
22
23
24
25
26
27
class AbstractHandlerMapping {
public final HandlerExecutionChain getHandler(HttpServletRequest request) throws Exception {
// 1. 匹配对应的handler实例 由子类实现
Object handler = getHandlerInternal(request);
// 2. 若对应不到,采取默认的handler实例
if (handler == null) {
handler = getDefaultHandler();
}
if (handler == null) {
return null;
}
// 3. 或是字符串,则从容器中获取对应实例
if (handler instanceof String) {
String handlerName = (String) handler;
handler = obtainApplicationContext().getBean(handlerName);
}
// 4. 加入拦截器,包装成 HandlerExecutionChain
HandlerExecutionChain executionChain = getHandlerExecutionChain(handler, request);
if (CorsUtils.isCorsRequest(request)) {
CorsConfiguration globalConfig = this.globalCorsConfigSource.getCorsConfiguration(request);
CorsConfiguration handlerConfig = getCorsConfiguration(handler, request);
CorsConfiguration config = (globalConfig != null ? globalConfig.combine(handlerConfig) : handlerConfig);
executionChain = getCorsHandlerExecutionChain(request, executionChain, config);
}
return executionChain;
}
}

getHandlerInternal 的匹配逻辑由子类实现,常用的有:

  • AbstractHandlerMethodMapping:匹配url到一个Handler方法
  • AbstractUrlHandlerMapping:匹配url到一个Handler类

以 AbstractUrlHandlerMapping 为例进行说明:

1
2
3
4
5
6
7
8
9
10
11
12
13
14
15
16
17
18
19
20
21
22
23
24
25
26
27
28
29
30
31
abstract class AbstractUrlHandlerMapping {
private final Map<String, Object> handlerMap = new LinkedHashMap<>();

protected Object getHandlerInternal(HttpServletRequest request) throws Exception {
// 获取 url
String lookupPath = getUrlPathHelper().getLookupPathForRequest(request);
// 根据 handlerMap 进行匹配
Object handler = lookupHandler(lookupPath, request);
if (handler == null) {
// We need to care for the default handler directly, since we need to
// expose the PATH_WITHIN_HANDLER_MAPPING_ATTRIBUTE for it as well.
Object rawHandler = null;
if ("/".equals(lookupPath)) {
rawHandler = getRootHandler();
}
if (rawHandler == null) {
rawHandler = getDefaultHandler();
}
if (rawHandler != null) {
// Bean name or resolved handler?
if (rawHandler instanceof String) {
String handlerName = (String) rawHandler;
rawHandler = obtainApplicationContext().getBean(handlerName);
}
validateHandler(rawHandler, request);
handler = buildPathExposingHandler(rawHandler, lookupPath, lookupPath, null);
}
}
return handler;
}
}

有子类去处理 handlerMap 的初始化,以 SimpleUrlHandlerMapping 为例:

1
2
3
4
5
6
7
8
9
10
11
12
13
14
15
16
17
18
19
20
21
22
23
24
25
26
27
28
29
30
31
32
class SimpleUrlHandlerMapping {
/**
* 父类实现了 ApplicationContextAware
* 在 setApplicationContext 中会调用initApplicationContext()
*/
@Override
public void initApplicationContext() throws BeansException {
super.initApplicationContext();
registerHandlers(this.urlMap);
}

/**
* 初始化 handlerMap
*/
protected void registerHandlers(Map<String, Object> urlMap) throws BeansException {
if (urlMap.isEmpty()) {
logger.warn("Neither 'urlMap' nor 'mappings' set on SimpleUrlHandlerMapping");
} else {
urlMap.forEach((url, handler) -> {
// Prepend with slash if not already present.
if (!url.startsWith("/")) {
url = "/" + url;
}
// Remove whitespace from handler bean name.
if (handler instanceof String) {
handler = ((String) handler).trim();
}
registerHandler(url, handler);
});
}
}
}

HandlerExecutionChain

HandlerExecutionChain 持有 处理器 和 拦截器

1
2
3
4
5
6
7
8
9
10
public class HandlerExecutionChain {

private final Object handler;

private HandlerInterceptor[] interceptors;

private List<HandlerInterceptor> interceptorList;

//else....
}

HandlerAdapter

1
2
3
4
5
6
7
8
public interface HandlerAdapter {

boolean supports(Object handler);

ModelAndView handle(HttpServletRequest request, HttpServletResponse response, Object handler) throws Exception;

long getLastModified(HttpServletRequest request, Object handler);
}

处理器的类型很多,统一适配成 HandlerAdapter 执行如:

  • 接口 Controller,适配器 SimpleControllerHandlerAdapter
  • 接口 HttpRequestHandler,适配器 HttpRequestHandlerAdapter
  • 接口 Servlet,适配器 SimpleServletHandlerAdapter

以 SimpleControllerHandlerAdapter 为例:

1
2
3
4
5
6
7
8
9
10
11
12
13
14
15
16
17
18
19
20
21
22
23
public class SimpleControllerHandlerAdapter implements HandlerAdapter {

@Override
public boolean supports(Object handler) {
return (handler instanceof Controller);
}

@Override
@Nullable
public ModelAndView handle(HttpServletRequest request, HttpServletResponse response, Object handler)
throws Exception {

return ((Controller) handler).handleRequest(request, response);
}

@Override
public long getLastModified(HttpServletRequest request, Object handler) {
if (handler instanceof LastModified) {
return ((LastModified) handler).getLastModified(request);
}
return -1L;
}
}

ModelAndView

持有 Model 和 View (或者 字符名)

1
2
3
4
5
6
7
8
public class ModelAndView {

@Nullable
private Object view;

@Nullable
private ModelMap model;
}

View

1
2
3
4
5
6
7
interface View {
/**
* 将返回解析到 response 中
*/
void render(@Nullable Map<String, ?> model,
HttpServletRequest request, HttpServletResponse response) throws Exception;
}

抽象实现:AbstractView

1
2
3
4
5
6
7
8
9
10
11
12
abstract class AbstractView {
@Override
public void render(@Nullable Map<String, ?> model, HttpServletRequest request,
HttpServletResponse response) throws Exception {

// 必要时,将 staticAttributes 和 requestContextAttribute 也整合到model中
Map<String, Object> mergedModel = createMergedOutputModel(model, request, response);
prepareResponse(request, response);
//由子类实现
renderMergedOutputModel(mergedModel, getRequestToExpose(request), response);
}
}

具体如何解析返回,由子类实现 renderMergedOutputModel 来实现,如 pdf(AbstractPdfView),excel(AbstractXlsView),资源文件jsp(InternalResourceView)等等

1
2
3
4
5
6
7
8
9
10
11
12
13
14
15
16
17
18
19
20
21
22
23
class AbstractPdfView {
protected final void renderMergedOutputModel(
Map<String, Object> model, HttpServletRequest request, HttpServletResponse response) throws Exception {

// IE workaround: write into byte array first.
ByteArrayOutputStream baos = createTemporaryOutputStream();

// Apply preferences and build metadata.
Document document = newDocument();
PdfWriter writer = newWriter(document, baos);
prepareWriter(model, writer, request);
buildPdfMetadata(model, document, request);

// Build PDF document.
document.open();
buildPdfDocument(model, document, writer, request, response);
document.close();

// Flush to HTTP response.
writeToResponse(response, baos);
}

}

RequestToViewNameTranslator

1
2
3
4
5
6
7
8
public interface RequestToViewNameTranslator {

/**
* 根据 request 获取一个 view name
*/
@Nullable
String getViewName(HttpServletRequest request) throws Exception;
}

有一个默认实现 DefaultRequestToViewNameTranslator,列如:/www/qwe.jsp 将会解析为 www/qwe

ViewResolver

1
2
3
4
5
6
7
8
public interface ViewResolver {

/**
* 将 view字符名 解析为 View
*/
@Nullable
View resolveViewName(String viewName, Locale locale) throws Exception;
}

如 InternalResourceViewResolver 将view字符名 解析为 InternalResourceView

DispatcherServle##doDispatch

再回到之前的 DispatcherServle##doDispatch 中:

1
2
3
4
5
6
7
8
9
10
11
12
13
14
15
16
17
18
19
20
21
22
23
24
25
26
27
28
class DispatcherServle {
protected void doDispatch(HttpServletRequest request, HttpServletResponse response) {
// 忽略无关代码...

processedRequest = checkMultipart(request);
// 获取 HandlerExecutionChain
HandlerExecutionChain mappedHandler = getHandler(processedRequest);

// 适配 Handler
HandlerAdapter ha = getHandlerAdapter(mappedHandler.getHandler());

// 拦截器前置处理
mappedHandler.applyPreHandle(processedRequest, response);

// 处理器执行
ModelAndView mv = ha.handle(processedRequest, response, mappedHandler.getHandler());

// RequestToViewNameTranslator 解析 request 获取 view Name
applyDefaultViewName(processedRequest, mv);

// 拦截器后置处理
mappedHandler.applyPostHandle(processedRequest, response, mv);

// 1. ViewResolver 解析 view Name 获取 View 对象
// 2. 执行 View##render 方法,处理成 response
processDispatchResult(processedRequest, response, mappedHandler, mv, dispatchException);
}
}

本文标题:spring MVC

文章作者:Sun

发布时间:2020年06月17日 - 20:06

最后更新:2020年06月23日 - 16:06

原始链接:https://sunyi720.github.io/2020/06/17/Spring/springMVC/

许可协议: 署名-非商业性使用-禁止演绎 4.0 国际 转载请保留原文链接及作者。