Spring AOP 实现

Spring AOP 实现

AOP概述

为什么需要AOP?

问题一:如何减少重复的代码?

将重复的代码抽离出来,在多个地方显示地声明调用

问题二:如何减少“声明调用”的代码重复?

再抽离,再显示地声明?

问题三:根据需要,每个地方的“声明调用”可能不完全相同,这是就无法统一抽离,并且这些“重复”可能是业务无关的,不应该在业务中进行“声明调用”

为了解决问题三,提出了AOP

AOP概念抽象:

  1. 连接点:业务代码块的边界处,可以使用声明进行功能的增强
  2. 切点:可以认为是连接点筛选的一个条件
  3. 通知:增强的相关逻辑
  4. 通知器:将切点和通知结合起来
  5. 织入:将通知写入到连接点的过程

根据织入的时间点可以分为:

  1. 编译器织入:生成已增强的.class
  2. 加载器织入:加载.class时完成增强
  3. 运行期织入:运行时动态生成增强代理类

spring AOP 和 AspectJ 的区别与联系?

AspectJ 主要的织入方式是编译器织入和加载器织入

spring AOP 主要的织入方式是运行期织入,使用JDK代理或者Cglib代理

spring AOP 可以基于 xml 实现通知器的配置,也可以基于 AspectJ 的注解实现通知器的配置,但最终都会适配为对拦截器的处理(详细见后)

Spring AOP 设计与实现

接口体系

image-20200602105702787

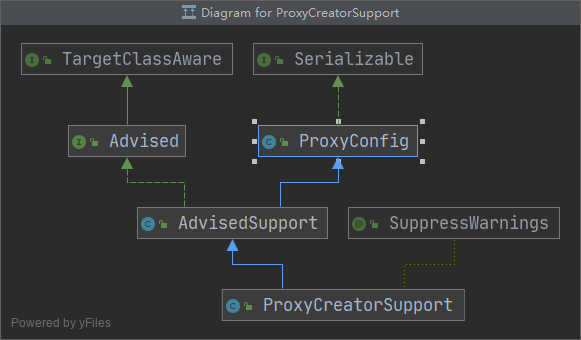
  • ProxyConfig:代理的配置类,为其 AOP 代理对象工厂实现类提供基本的配置属性

  • Adivised:接口,定义了代理配置信息的获取方法,以及对 AOP 中通知、通知器、目标对象等的装配方法

  • AdivisedSupport:Adivised 的实现类,基于 ProxyConfig

  • ProxyCreatorSupport:基于 AdivisedSupport 中 AOP 配置和代理配置,提供生成代理类的功能(使用默认的代理对象工厂实现DefaultAopProxyFactory,该工厂基于 jdk 和 cglib)

  • ProxyCreatorSupport 子类:提供 aop 的装配
    • ProxyFactoryBean:基于 xml 进行装配
    • ProxyFactory:基于编程的方式进行装配
    • AspectJProxyFactory:基于 AspectJ 注解进行装配

ProxyConfig详情可见:https://www.jianshu.com/p/b38b1a8cb0a4

ProxyFactoryBean

接下来以 ProxyFactoryBean 为代表,对 spring AOP 的源码逻辑进行分析:

XML装配方式:

1
2
3
4
5
6
7
8
9
10
11
12
13
14
15
16
17
18

<bean id="testAdvisor" class="com.abc.TestAdvisor"
<property name="pointcut" ref="bookPointcut"/>
<property name="advice" ref="aroundMethod"></property>
</bean>
<bean id="testAop" class="org.springframeword.aop.ProxyFactoryBean">
<property name="proxyInterfaces">
<value>com.test.AbcInterface</value>
</property>
<property name="target">
<bean class="com.abc.TestTarget"/>
</property>
<property name="interceptorNames">
<list>
<value>testAdvisor</value>
</list>
</property>
</bean>

由于 ProxyFactoryBean 是 spring 中管理的一个 FactoryBean 类,所以可以从他的 getObject() 方法着手:

1
2
3
4
5
6
7
8
9
10
11
12
13
14
15
16
class ProxyFactoryBean {
public Object getObject() throws BeansException {
//1. 根据xml配置,进行通知器装配
initializeAdvisorChain();
//2. 返回完成增强的代理对象
if (isSingleton()) {
return getSingletonInstance();
} else {
if (this.targetName == null) {
logger.warn("Using non-singleton proxies with singleton targets is often undesirable. " +
"Enable prototype proxies by setting the 'targetName' property.");
}
return newPrototypeInstance();
}
}
}

先看 ProxyFactoryBean#initializeAdvisorChain() 方法

1
2
3
4
5
6
7
8
9
10
11
12
13
14
15
16
17
18
19
20
21
22
23
24
25
26
27
28
29
30
31
32
33
34
35
36
37
38
39
40
41
42
class ProxyFactoryBean{
private synchronized void initializeAdvisorChain() throws AopConfigException, BeansException {
if (this.advisorChainInitialized) {
return;
}

// interceptorNames 来自XML中的配置
if (!ObjectUtils.isEmpty(this.interceptorNames)) {

// 相关校验...

for (String name : this.interceptorNames) {
if (logger.isTraceEnabled()) {
logger.trace("Configuring advisor or advice '" + name + "'");
}

// 处理通配符“*”
if (name.endsWith(GLOBAL_SUFFIX)) {
if (!(this.beanFactory instanceof ListableBeanFactory)) {
throw new AopConfigException(
"Can only use global advisors or interceptors with a ListableBeanFactory");
}
addGlobalAdvisor((ListableBeanFactory) this.beanFactory,
name.substring(0, name.length() - GLOBAL_SUFFIX.length()));
} else {

// 获取通知器Bean
Object advice;
if (this.singleton || this.beanFactory.isSingleton(name)) {
advice = this.beanFactory.getBean(name);
} else {
advice = new ProxyFactoryBean.PrototypePlaceholderAdvisor(name);
}
// 加入通知器链
addAdvisorOnChainCreation(advice, name);
}
}
}

this.advisorChainInitialized = true;
}
}

接着看 ProxyFactoryBean#addAdvisorOnChainCreation

1
2
3
4
5
6
7
8
9
10
11
class ProxyFactoryBean{
private void addAdvisorOnChainCreation(Object next, String name) {
// 1. 将 Advice 和 MethodInterceptor(Advice子类) 拼上默认的 PointCut 适配成 Advisor
Advisor advisor = namedBeanToAdvisor(next);
if (logger.isTraceEnabled()) {
logger.trace("Adding advisor with name '" + name + "'");
}
// 2. 调用 AdvisedSupport#addAdvisor 装配 通知器到 advisors 列表中
addAdvisor(advisor);
}
}

在回到 getObject() 中看 getSingletonInstance() 的逻辑,代理类的生成逻辑可追溯到 DefaultAopProxyFactory#createAopProxy()

1
2
3
4
5
6
7
8
9
10
11
12
13
14
15
16
17
18
class DefaultAopProxyFactory{
//基于 ProxyConfig 的代理配置,有选择地使用 JDK代理方式 JdkDynamicAopProxy 或 Cglib代理方式 ObjenesisCglibAopProxy
public AopProxy createAopProxy(AdvisedSupport config) throws AopConfigException {
if (config.isOptimize() || config.isProxyTargetClass() || hasNoUserSuppliedProxyInterfaces(config)) {
Class<?> targetClass = config.getTargetClass();
if (targetClass == null) {
throw new AopConfigException("TargetSource cannot determine target class: " +
"Either an interface or a target is required for proxy creation.");
}
if (targetClass.isInterface() || Proxy.isProxyClass(targetClass)) {
return new JdkDynamicAopProxy(config);
}
return new ObjenesisCglibAopProxy(config);
} else {
return new JdkDynamicAopProxy(config);
}
}
}

以 JdkDynamicAopProxy 为例进行分析,JDK 的代理主要的代理逻辑在 InvocationHandler#invoke 中,因此我们查看 JdkDynamicAopProxy#invoke 方法

1
2
3
4
5
6
7
8
9
10
11
12
13
14
15
16
17
18
19
20
21
22
23
24
25
26
27
28
29
30
31
32
33
34
35
36
37
38
39
40
41
42
43
44
45
46
47
48
49
50
51
52
53
class JdkDynamicAopProxy implements InvocationHandler{
public Object invoke(Object proxy, Method method, Object[] args) throws Throwable {
MethodInvocation invocation;
Object oldProxy = null;
boolean setProxyContext = false;

TargetSource targetSource = this.advised.targetSource;
Object target = null;

//1. 代理方法equals()、hashCode()
//代理接口 DecoratingProxy、Advised
//这也就说明代理类可以直接转换成Advised,操作AOP属性
try {
if (!this.equalsDefined && AopUtils.isEqualsMethod(method)) {
return equals(args[0]);
} else if (!this.hashCodeDefined && AopUtils.isHashCodeMethod(method)) {
return hashCode();
} else if (method.getDeclaringClass() == DecoratingProxy.class) {
return AopProxyUtils.ultimateTargetClass(this.advised);
} else if (!this.advised.opaque && method.getDeclaringClass().isInterface() &&
method.getDeclaringClass().isAssignableFrom(Advised.class)) {
//ProxyConfig中opaque属性作用
return AopUtils.invokeJoinpointUsingReflection(this.advised, method, args);
}

Object retVal;

//ProxyConfig中exposeProxy属性作用
if (this.advised.exposeProxy) {
oldProxy = AopContext.setCurrentProxy(proxy);
setProxyContext = true;
}

target = targetSource.getTarget();
Class<?> targetClass = (target != null ? target.getClass() : null);

//2. 获取拦截器链(关键步骤)
List<Object> chain = this.advised.getInterceptorsAndDynamicInterceptionAdvice(method, targetClass);

if (chain.isEmpty()) {
//拦截器链为空,直接执行目标方法
Object[] argsToUse = AopProxyUtils.adaptArgumentsIfNecessary(method, args);
retVal = AopUtils.invokeJoinpointUsingReflection(target, method, argsToUse);
} else {
//封装为增强后的连接点
invocation = new ReflectiveMethodInvocation(proxy, target, method, args, targetClass, chain);
//连接点方法执行(责任链模式)
retVal = invocation.proceed();
}
return retVal;
}
}
}

通知的形容很多,如before、afterReturn、afterThrow,这些不同的形式如何统一成拦截器链进行工作?连接点如何工作?

我们进入连接点中查看 ReflectiveMethodInvocation#proceed 方法

1
2
3
4
5
6
7
8
9
10
11
12
13
14
15
16
17
18
19
20
21
22
23
class ReflectiveMethodInvocation{
public Object proceed() throws Throwable {
//1. 拦截器从-1开始,直到结束
if (this.currentInterceptorIndex == this.interceptorsAndDynamicMethodMatchers.size() - 1) {
return invokeJoinpoint();
}

//2. 执行,稍后分析
Object interceptorOrInterceptionAdvice =
this.interceptorsAndDynamicMethodMatchers.get(++this.currentInterceptorIndex);
if (interceptorOrInterceptionAdvice instanceof InterceptorAndDynamicMethodMatcher) {
InterceptorAndDynamicMethodMatcher dm =
(InterceptorAndDynamicMethodMatcher) interceptorOrInterceptionAdvice;
if (dm.methodMatcher.matches(this.method, this.targetClass, this.arguments)) {
return dm.interceptor.invoke(this);
} else {
return proceed();
}
} else {
return ((MethodInterceptor) interceptorOrInterceptionAdvice).invoke(this);
}
}
}

由此可见,这里关键的类是 InterceptorAndDynamicMethodMatcher 和 MethodInterceptor

  • MethodInterceptor:Interceptor的子类,Interceptor又是Advice的子类,所以拦截器是一种特殊的通知

  • InterceptorAndDynamicMethodMatcher :包装了 MethodInterceptor 和 MethodMatcher,MethodMatcher 是切点 PointCut 判断的方法

1
2
3
4
5
6
7
8
9
10
11
12
13
14
15
16
class InterceptorAndDynamicMethodMatcher {

final MethodInterceptor interceptor;

final MethodMatcher methodMatcher;

public InterceptorAndDynamicMethodMatcher(MethodInterceptor interceptor, MethodMatcher methodMatcher) {
this.interceptor = interceptor;
this.methodMatcher = methodMatcher;
}
}

public interface MethodInterceptor extends Interceptor {

Object invoke(MethodInvocation invocation) throws Throwable;
}

这里有两个问题:

  1. 我们定义的是通知器,为何变成了 MethodInterceptor ?
  2. MethodInterceptor 里的 invoke 到底做什么什么事情?

我们大致可以猜到,某个地方采用了适配器,在 JdkDynamicAopProxy#invoke 中关键的一步:

1
2
//2. 获取拦截器链(关键步骤)
List<Object> chain = this.advised.getInterceptorsAndDynamicInterceptionAdvice(method, targetClass);

追溯下去可以来到 DefaultAdvisorChainFactory#getInterceptorsAndDynamicInterceptionAdvice 中:

1
2
3
4
5
6
7
8
9
10
11
12
13
14
15
16
17
18
19
20
21
22
23
24
25
26
27
28
29
30
31
32
33
34
35
36
37
38
39
40
41
42
43
class DefaultAdvisorChainFactory implements AdvisorChainFactory{
public List<Object> getInterceptorsAndDynamicInterceptionAdvice(
Advised config, Method method, @Nullable Class<?> targetClass) {

List<Object> interceptorList = new ArrayList<>(config.getAdvisors().length);
Class<?> actualClass = (targetClass != null ? targetClass : method.getDeclaringClass());
boolean hasIntroductions = hasMatchingIntroductions(config, actualClass);
// 1. 全局适配器注册器定义
AdvisorAdapterRegistry registry = GlobalAdvisorAdapterRegistry.getInstance();

for (Advisor advisor : config.getAdvisors()) {
if (advisor instanceof PointcutAdvisor) {
PointcutAdvisor pointcutAdvisor = (PointcutAdvisor) advisor;
if (config.isPreFiltered() || pointcutAdvisor.getPointcut().getClassFilter().matches(actualClass)) {
// 2. 进行适配
MethodInterceptor[] interceptors = registry.getInterceptors(advisor);
MethodMatcher mm = pointcutAdvisor.getPointcut().getMethodMatcher();
if (MethodMatchers.matches(mm, method, actualClass, hasIntroductions)) {
if (mm.isRuntime()) {
// 3. 加入到拦截器链中
for (MethodInterceptor interceptor : interceptors) {
interceptorList.add(new InterceptorAndDynamicMethodMatcher(interceptor, mm));
}
} else {
interceptorList.addAll(Arrays.asList(interceptors));
}
}
}
} else if (advisor instanceof IntroductionAdvisor) {
IntroductionAdvisor ia = (IntroductionAdvisor) advisor;
if (config.isPreFiltered() || ia.getClassFilter().matches(actualClass)) {
Interceptor[] interceptors = registry.getInterceptors(advisor);
interceptorList.addAll(Arrays.asList(interceptors));
}
} else {
Interceptor[] interceptors = registry.getInterceptors(advisor);
interceptorList.addAll(Arrays.asList(interceptors));
}
}

return interceptorList;
}
}

GlobalAdvisorAdapterRegistry 是一个单例模式,可以获取 AdvisorAdapterRegistry 的单例对象,默认是 DefaultAdvisorAdapterRegistry

DefaultAdvisorAdapterRegistry 内注册了 各种 AdvisorAdapter ,我们接着进入 DefaultAdvisorAdapterRegistry#getInterceptors 中

1
2
3
4
5
6
7
8
9
10
11
12
13
14
15
16
17
18
19
20
21
22
23
24
25
26
27
28
29
30
31
32
class DefaultAdvisorAdapterRegistry {
private final List<AdvisorAdapter> adapters = new ArrayList<>(3);

public DefaultAdvisorAdapterRegistry() {
registerAdvisorAdapter(new MethodBeforeAdviceAdapter());
registerAdvisorAdapter(new AfterReturningAdviceAdapter());
registerAdvisorAdapter(new ThrowsAdviceAdapter());
}

public MethodInterceptor[] getInterceptors(Advisor advisor) throws UnknownAdviceTypeException {
List<MethodInterceptor> interceptors = new ArrayList<>(3);

// 之前有将 Advice 和 MethodInterceptor(Advice子类) 适配成 Advisor
Advice advice = advisor.getAdvice();

// 若 Advisor 中的通知是 MethodInterceptor 则无需处理
if (advice instanceof MethodInterceptor) {
interceptors.add((MethodInterceptor) advice);
}

// 若是 Advice ,则遍历选择合适的适配器 适配成 MethodInterceptor
for (AdvisorAdapter adapter : this.adapters) {
if (adapter.supportsAdvice(advice)) {
interceptors.add(adapter.getInterceptor(advisor));
}
}
if (interceptors.isEmpty()) {
throw new UnknownAdviceTypeException(advisor.getAdvice());
}
return interceptors.toArray(new MethodInterceptor[interceptors.size()]);
}
}

AdvisorAdapter 是真正进行适配的类

1
2
3
4
5
6
7
8
9
10
11
12
public interface AdvisorAdapter {

/**
* 支持那种 Advice 的适配
*/
boolean supportsAdvice(Advice advice);

/**
* 将 Advisor 适配成 MethodInterceptor
*/
MethodInterceptor getInterceptor(Advisor advisor);
}

spring 中默认的有三类:

  1. AfterReturningAdviceAdapter:适配 AfterReturningAdvice
  2. MethodBeforeAdviceAdapter:适配 MethodBeforeAdvice
  3. ThrowsAdviceAdapter:适配 ThrowsAdvice

以 AfterReturningAdviceAdapter 为代表进行分析:

1
2
3
4
5
6
7
8
9
10
11
12
13
class AfterReturningAdviceAdapter implements AdvisorAdapter, Serializable {

@Override
public boolean supportsAdvice(Advice advice) {
return (advice instanceof AfterReturningAdvice);
}

@Override
public MethodInterceptor getInterceptor(Advisor advisor) {
AfterReturningAdvice advice = (AfterReturningAdvice) advisor.getAdvice();
return new AfterReturningAdviceInterceptor(advice);
}
}

可以看到,将 AfterReturningAdvice 转换成 AfterReturningAdviceInterceptor,到此我们解决了问题1,那么分析问题2(MethodInterceptor 里的 invoke 到底做什么什么事情?)

以 AfterReturningAdviceInterceptor 为代表进行分析:

1
2
3
4
5
6
7
8
9
10
11
12
13
14
15
16
17
18
public class AfterReturningAdviceInterceptor implements MethodInterceptor, AfterAdvice, Serializable {

private final AfterReturningAdvice advice;

public AfterReturningAdviceInterceptor(AfterReturningAdvice advice) {
Assert.notNull(advice, "Advice must not be null");
this.advice = advice;
}

@Override
public Object invoke(MethodInvocation mi) throws Throwable {
// 1. 推进拦截器链,递归
Object retVal = mi.proceed();
// 2. 执行通知,这里因为是 AfterReturning,所以后执行
this.advice.afterReturning(retVal, mi.getMethod(), mi.getArguments(), mi.getThis());
return retVal;
}
}

ProxyFactory

上面就是对ProxyFactoryBean的分析,我们说了是基于XML对通知器的进行装配,接着看看 ProxyFactory 编程式装配:

1
2
3
4
5
6
7
8
9
10
11
class Test{
public void test(){
ProxyFactory factory = new ProxyFactory();
factory.setInterfaces(new Class[] { PeopleService.class });
factory.addAdvice(new AroundInteceptor());
factory.setTarget(new EnglishService());
PeopleService peopleProxy = (PeopleService) factory.getProxy();
peopleProxy.sayHello();
System.err.println(peopleProxy.getClass().getName());
}
}

可以看到 ProxyFactory 就是用代码进行装配,其底层都是一样的,再看最后的 AspectJProxyFactory

AspectJProxyFactory

AspectJProxyFactory 其实和真正的 AspectJ 关系不大,直接借用了 AspectJ 的注解来装配通知器

使用如下:

1
2
3
4
5
6
7
8
9
10
11
12
@Aspect
public class MyAspect {

@Pointcut("execution(* add(..))")
private void beforeAdd() {}

@Before("beforeAdd()")
public void before1() {
System.out.println("-----------before-----------");
}

}

有兴趣的可以继续查看其源码

总结:

  1. 无论是 Advice 还是 Interceptor,最终都会处理成 Interceptor链,在动态代理中进行增强

本文标题:Spring AOP 实现

文章作者:Sun

发布时间:2020年05月25日 - 15:05

最后更新:2020年06月23日 - 16:06

原始链接:https://sunyi720.github.io/2020/05/25/Spring/AOP的实现/

许可协议: 署名-非商业性使用-禁止演绎 4.0 国际 转载请保留原文链接及作者。